Mastering Your Squarespace Header Editor: January 2024 Updates
A Comprehensive Guide
If you've recently explored your Squarespace editor and noticed some changes in the back end, don’t fret! Squarespace made some updates in January of 2024, and I’m going to walk you through all the options available in your newly updated Header Editor so you can finesse your site header with confidence.
Watch the Video
Watch the YouTube video for a step-by-step guided tour through your Header Editor 🪄👩🏻💻
What’s New
You might notice a slicker, sleeker, sexier interface in the back end of your Squarespace website. Squarespace updates are always exciting, but sometimes it can take a minute to get the hang of the new landscape. Here we’ll walk through everything you need to know about how to customize your Squarespace Site Header using the newly updated and completely customizable Squarespace Header Editor tool. There are so many new options for customization!
What’s in My Header
By default when you start a site, you’ll see your site title and your navigation menu. But you can add all kinds of other things like social links, a shopping cart, CTA buttons, and customizations for language and member areas. In your header, you can choose to display either a site title or a logo. It’s still important to give your site a clear and concise title (like the name of your business or brand) even if you upload a logo.
How do I get to my Squarespace Header Editor?
Right through your main site editor!
click Edit
hover over the header area
click Edit Site Header
Edit Site Header Menu

Squarespace Header Editor Options
Once you click into Edit Site Header, two additional clickable menu options will appear: Add Elements on the left and Edit Design on the right.

Add Elements is where we decide what “stuff” we want in the header, and Edit Design is where we style that “stuff,” so we’ll start by clicking into the Add Elements menu.
A Tour of Your Add Elements Menu
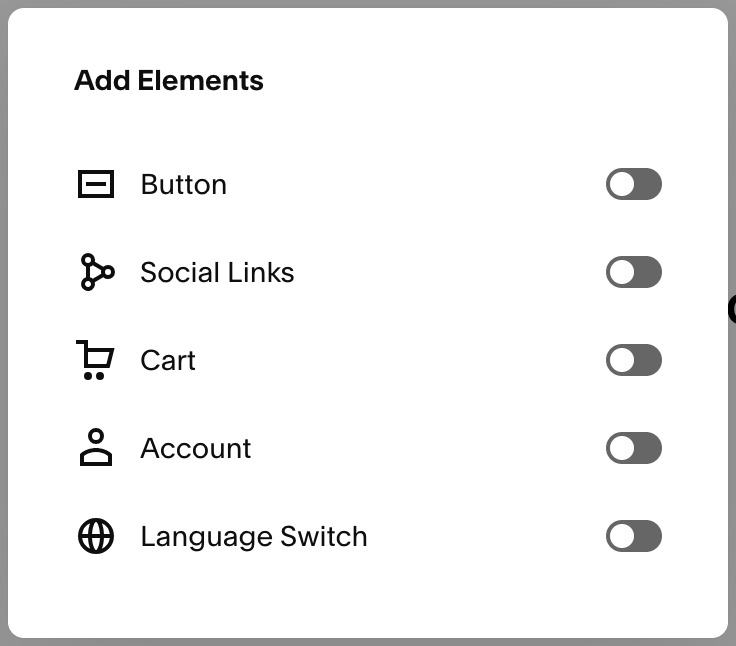
Adding Elements to your Squarespace Header
The Add Elements menu is all about what goes into your header, so we only have the option to toggle these elements on or off. You have five options:
a button
social links
a shopping cart
account (for plans with memberships)
language switch (if you’ve set up a site in more than one language)
The last two options require additional setup, so in this demo we’ll choose from the first three options.
—
Updating your Logo and Site Title
There’s one element that you change right in its own editor, and that’s your site title and logo element. Here’s how to get around.
In your Edit Site Header menu …
hover over your Site Title / Logo area
blue lines will appear
click inside the lines
click click the pencil
give your site a title (or change it)
upload a logo (or replace it)
use a .png file with a transparent background
use sliders to adjust the logo’s desktop and mobile sizing
you can even upload a mobile-only logo!
click Save
Updating the Pages in Your Navigation Menu
This is done outside of your header editor in you side bar. So you’ll click Save and Exit to get out of your editor, go to Website, and click the (+) sign to add new pages.
Navigate to Your Edit Design Menu
This is the fun part. Now that you have all your header content, it’s time to organize and style it.
click Edit to get back into your site editor
hover over the header area
click Edit Site Header
on the right, click Edit Design
Take A Peek at Your Edit Design Menu

Squarespace Header Design Options
There are so many design options to style your Squarespace header! Let’s go through all of them:
layout
spacing
drop shadow
border
header scrolling behavior
height and width
colors, gradients, opacity, and blur
P.S. If you’re into specifics …
I go into *excessive* detail and demonstrations of each in the video tutorial above.
Side Note:
Styling Your Site-Wide Color Palette
(and other styles)
We’ve been talking about styles specific to your header, but if you want to change your site-wide color palette, that’s done outside your header editor, too.
For Site-Wide Styles:
Click the paintbrush in the top right. Here you can style:
fonts
colors
animations
spacing
button styles
forms
image blocks
Phew!
Dang, That Header is Stylin’ 😎
It may only be an inch of your website but you can sure customize the heck out of your Squarespace site header! Did this help? Don’t forget to subscribe to my YouTube channel for more Squarespace tutorials and as always …
Have a blast designing your Squarespace website!
Get insider access to my exclusive updates
(no spam, I promise)
Your Squarespace Designer
Hey, I’m Kessiah, a Squarespace web designer for happy visionaries of all industries. As an official Squarespace-vetted Expert and Squarespace Circle Member, I work with businesses and brands of all shapes and sizes, including startups, corporations, agencies, nonprofits, and solopreneurs to build Squarespace websites that work for you. If you’d like to talk shop, you can email me at hello@kessiah.com, leave me a note here, or let’s hop on a call here to tell me all about what you have in mind. Let’s build the website of your dreams!